Avatar & Tracking
Options for loading in new avatars (VRM0, VRM1, and VSFAvatar files supported).
- Here you can also enable 3D face tracking, and microphone based avatar lip sync.
- VRMoveTime also supports the Spout2 plugin, commonly used to send VTuber avatar images to OBS as a Spout2 source.
- Click on “Load New Avatar” or “New Avatar Preset” to choose an avatar file. Two avatar samples are included with the program.
- Support for VSFAvatars (an advanced model format that can do almost anything you can think of in a game engine) has been enhanced to fully work with any animation they can be imported with, which includes animations that don’t affect all avatar parts/bones.
- Expand the sections below for more info on most options:
3D Face Tracking – Receive face tracking data from iPhone or Android phones or PC webcams
- Connects to your phone to receive 3D tracking data from apps such as iFacialMocap and FaceMotion 3D (iPhone), VTubeStudio (Android and iPhone), and Meowface (Android).
- You’ll need to enter your phone’s IP address in the Phone IP field, which can be found in your phone’s Wireless settings.
- VTube Studio requires you to enable the “3rd Party PC Clients” option at the bottom of it’s settings. It will also show your phone’s IP address the “Show IP list” button there.
- After clicking the checkbox to enable the connection, you may need to click “Allow” if a Windows firewall notification pops up.
- Note that there is an issue with the current Android version of VTube Studio where your avatars eyelids or eyebrows might be too closed/low by default. You can use the Blink/Brow Offset options under Face Tracking to fix this, and may want to apply some Smoothing as well. Blink and Brow Offset should only be increased by the minimum necessary to fix the issue. This issue is not preset in the iPhone version.
- If there’s a problem with the connection, hover your cursor over the wireless indicator to the right of the IP address entry in VRMoveTime, which will give you tips about how to fix it.
- Also, although this is definitely a more advanced alternative, its possible to receive 3D Face Tracking using your PC or another PC’s webcam via the app “iFacialMocap Powered by NVIDIA Broadcast”, with a video tutorial on how to set this up available from Kana Fuyuko.
The following 3D Face Tracking sub-options are available (expand for more details):
Head Tracking – How much head movement tracking to receive.
- Movement Range – Increases how far the avatar will move based on your head movement.
- Rotation Range – Increases the maximum angle the avatar can turn based when you turn your head.
- Body Rotation – Changes how much the avatar will move their shoulders when you turn your head.
- Locomotion – Allows the avatars legs and full body to move around based on your head movement.
- Smoothing – If your avatar is moving around unintentionally too often, increasing this setting can filter out those movements at the cost of adding a delay to tracking.
- Jitter Reduction – Similar to Smoothing, but is more about reducing rapid shaking head shaking. The issues that Smoothing and Jitter Reduction can fix can also usually be fixed by movement your camera closed to your head, having your head lit a bit better, or both.
- Look At Camera – Allows your avatars head to look right at the camera automatically.
Face Tracking – The degree of face tracking to be received.
- Blink/Brow Sensitivity – A multiplier for eye blink or eyebrow movement.
- Blink/Brow Offset – Shifts the minimum value for eyes or eyebrows to be closed/down, in case your tracking device is picking up your eyes as being closed too often or eyebrows being too low.
- Mouth Size – Changes how much the avatar’s mouth opens when you open your mouth.
- Mouth Width – Widens the avatars mouth by a minimum amount and acts as a multiplier.
- Smoothing – Smooths out erratic blinks, eyebrow movement, and mouth movement by adding a delay to face tracking.
- Jitter Reduction – Prevents rapid back and forth movements for eyebrows, blinks, and the mouth. Moving your camera closer or adding another light source to your face so the camera can see you better might reduce or remove the need for Jitter Reduction and Smoothing.
Gaze Tracking – How much eye movement tracking to receive.
- Eye Movement – Acts as a multiplier for eye movement.
- Smoothing – Smooths out potentially unwanted eye movement on the avatar if your camera isn’t picking up your own eye movement well.
- Jitter Reduction – Prevents the avatars eyes from jittering rapidly, which can be an issue for people that wear glasses while streaming. Combining Jitter Reduction with some amount of Smoothing is usually necessary to fix errant eye movement issues.
- Look At Camera – Allows the avatars eyes look toward the camera automatically.
Idle Animation – Controls the strength of the animations that play when the avatar is still.
- Arm Angle Adjustment – Controls the default angle of the avatars arms, which can be adjusted to prevent their arms from piercing into their outfit.
- Arm Sway – Makes the avatars arms move a more or less so they’re not just in one place all the time, the speed can also be set.
- Breathing – Simulates breathing motions for the avatar, with the speed also being customizable.
- Hand Movement Threshold – When hand tracking is enabled and the avatars hands and arms are moving, this option controls how much movement is necessary before it will interrupt other animations and make the avatar put their Virtual Controller away temporarily.
Lip Sync Device – Changes which microphone (if any) to use for avatar lip syncing.
- Audio Input Gain – Boosts the volume of the received audio from the microphone.
- Mouth Movement – Increases or decreases how much the avatar’s mouth moves from lip sync.
- Mouth Tracking Blend – Changes how much to blend face/mouth tracking in with audio lip sync. When the value is 0 and lip sync is active, it will completely override mouth tracking.
OSC/VMC Receiver – Receive face/body/hand tracking from other apps
- Local Port: This is the input port that VRMoveTime is expecting to receive data from, with the pre-input value of 39539 being the default port number that apps like VSeeFace send from by default.
- Receive Body/Face Tracking – How much externally received head/face tracking will affect the avatar, this can be used to blend external app tracking in with direct tracking.
- Receiver Floor Offset – When receiving external tracking from apps such as VNyan using the JayoVMC plugin, your avatar may appear to float above or below the floor and this option can be used to fix that.
- I’ve made tutorial videos on how to setup this option for VSeeFace, VNyan, and Warudo in English and Japanese. You should load the same avatar in both programs to have the avatar movement transfer properly.
VMC Sender – Send face/body tracking, movement, and animations to other apps
- IP/Port: 127.0.0.1 (default value) is always the address for your own computer, but you can change the address to a different computer on your local network and send tracking data to it as well. The default port of 3333 is the port that apps like VNyan are expecting to receive from by default.
- Send Body/Face Tracking – How much face/body tracking to send to the external app, as apps like VNyan can receive tracking data from multiple sources and combine them.
- Sender Floor Offset – Just in case your avatar appears above or below the floor in the external app when receiving tracking data from VRMoveTime, this can be used to move them up and down.
Avatar Visibility – Change whether your avatar is shown, including in apps like OBS through the Spout2 plugin.
- Spout2 is a very high performance alternative to using a game capture source in OBS (or other streaming apps), and can make the background behind the avatar transparent without needing green-screens or chroma/color key filters. I’ve made tutorial videos on how to set it up in English and Japanese, with links to the plugin in the video descriptions.
- Mirror Avatar – Mirror’s the avatars appearance on the selected axis. Hit the Z axis button several times in a row for a Special Option.
- Spout2 Transparency – Controls how much your avatar can be seen through in the application receiving the image from VRMoveTime through the Spout2 plugin.

Scene Options
In the 2nd tab/button here, you can move the avatar and camera using the menu, control if the avatar or camera Virtual Controllers are displayed, and create position presets that can save and smoothly move the avatar, camera, and virtual controllers back to those positions.
Creating and Using Position Presets

- Click the “Save Positions in New Preset” button at the bottom of the tab. Each preset can have its named changed by erasing the default name and typing a new one.
- ① Play/Stop – Activates or stops the preset
- ② Move Avatar Toggle – If not highlighted, the avatar will not move with the preset
- ③ Move Camera Toggle – If not highlighted, the camera will not move with the preset
- ④ Show Avatar Controller – The camera virtual controller will/won’t be move and will be activated/deactivated depending on whether this is button is highlighted
- ⑤ Show Camera Controller – Same as the Avatar Controller button, but for the virtual controller displayed on the camera screen.
- ⑥ ⏶Delay – The ⏶ button will move the preset up or up in the list, and the Delay slider allows you to add timer that counts down to play the preset when it is activated. You can also use this to chain multiple position presets together by changing their delays and assigning the same hotkey.
- ⑦ ⏷Duration – The ⏷ button moves the preset down in the list and the Duration slider controls how long it takes for preset to play out. Longer duration mean the avatar and camera will move more slowly, and the avatar will walk instead of run. A duration below one second will slide the avatar into position rather than having them walk.
- ⑧ Add Hotkey – Lets you make a global hotkey that will activate the preset, which will work even if the application is in the background or minimized.
- ⑨ Re-Save Button – Saves new positions for the preset
- ⑩ Duplicate Button – Makes a copy of the preset
Set Avatar/Camera Position – Move the avatar and camera using menu sliders.
- The checkbox determines whether the avatar or camera will move when the preset is activated. Their positions are saved to the preset even if these checkboxes are not checked, and you can use these two buttons to toggle these options on and off per-preset after the preset is created:
Show Avatar/Screen Controller – Move and change properties of the virtual controllers
- These options are identical to the ones presented in the Virtual Controller (7th) tab, and their values are synced.
- The checkbox determines whether the respective controllers are active, and whenever the virtual controllers will be shown when position preset is saved and activated. All controller properties are saved to position presets upon their creation.
- See the Virtual Controller [7th] tab for more info on VC customization.

Stage & Lighting
The 3rd tab, where you can change the size of the stage, the colors and position of the stage and lights, and where you want the stage to be shown.

Props
The 4th tab, which lets you load new image (jpg/jpeg, png, or (animated) gif) files as stickers drop on the background or stick on the avatar.
Sticker Options
- Adjust Distance, X-Axis, and Y-Axis – After having been placed down, these move the sticker forward/back, left/right, and up/down.
- Adjust Size, Width, and Height
- Auto-Hide Image / Auto-Hide Enabled – The first checkbox applies to just one sticker, and the second applies to all of them. If both are enabled, the sticker will be automatically hidden after the specified delay.
- Minimum/Maximum Hide Delay – When Auto-Hide is activated for a sticker, a random value is chosen between the minimum and maximum values selected to wait before the sticker is hidden. You can change the min/max hide delay for each placed sticker to create effects when stickers are hidden, like a streak or other patterns.
- Rotate Image – Can be changed with Shift+Mouse Wheel as well as using the slider bar.
- Mirror Image – Can also be changed with the X and Y keyboard keys as well as the left and right scroll wheel tilt if your mouse has left/right scroll wheel buttons.
- Smooth Motion – If a sticker is attached to the avatar, it will follow them around more slowly/smoothly rather than just affixed.
- Hover Effect – Makes the sticker float up and down, and can be combined with Smooth Motion to make it appear as though a flying creature is following the avatar around.
- Sticker Visibility – Change between four options:
- Off – All stickers are completely hidden
- On – Stickers are only shown in the VRMoveTime app window (not on stream)
- On ‘VRMoveTime’ Spout2 (Placed Only) – Shows stickers on stream, but only after they are placed down.
- On ‘VRMoveTime’ Spout2 (Dragging) – Shows stickers on stream even while they are being dragged around by the cursor.
Using Stickers
- After loading a new file, click on the image to pick it up and drag it around. While dragging, You can now change its properties using the mouse wheel along with the keys displayed in the upper-left button tip box, or with the interface sliders.
- After being placed, you can click on a sticker to select it and change its properties in the same way without having to move it.
- You can also create a Hotkey that toggles the image on and off. These hotkeys can then be activated by streamer programs such as StreamDeck or MixItUp than can send global key presses to other programs.

Keyboard & Mouse
These are options for controlling how avatar and camera move based on input, and various shortcut and movement key bindings with optional global input. Global Input means that the shortcut or movement keys can be received even when VRMoveTime is in the background or minimized, just like Hotkeys. If you have a keypad on the right side of your keyboard, it’s configured for global input with VRMT by default, meaning you can control your avatar those keys even if you’re playing a full-screen game.
Input Settings
- Avatar / Camera Movement Speed – Controls how fast the camera and avatar will move, with faster speeds causing the avatar to run or sprint without having the use the Sprint key.
- Avatar Strafe Movement – This is the default movement setting, and makes the avatar always move relative to the camera. Turning this off will instead have the avatar face towards their movement direction.
- Avatar Tank Controls – With this option, the avatar will move forward or backward based on their current facing direction. This may be easier when sending movement to other apps like VNyan (using via the OSC-Sender option in the Avatar [1st] tab), as the camera angle in the other app may not match the camera angle in VRMoveTime. This option was requested by Jessica Pixel and you can see a demonstration of her using it in the front page background video.
- Free-Cam Stabilization – With this option enabled, after moving the camera around in free-cam move (default right mouse button along with the movement keys), if the camera has been flipped upside-down it will automatically straighten itself.
- Remap Physical F1-F12 Keys to F13-F24 – This is an advanced option that changes how VRMoveTime receives the F1-F12 keys by changing them to be received as F13-F24 instead. With this enabled, even if you don’t have the F13-F24 keys on your keyboard, you can still create hotkeys or shortcut keys them. Here are some advantages to using F13-F24 as hotkeys:
- You can save some space on your keyboard so you don’t run out of hotkeys
- Programs like StreamDeck and MixItUp are able to send and trigger F13-F24 hotkeys. Having them send the regular F1-F12 keys instead can be problematic, because they will be sending it to all programs, not just VRMoveTime, and many games use keys like F5 – F8 for quick-save or quick-load, or other important functions.
Keyboard & Mouse Bindings – Shortcuts for avatar movement and other app functions
- Global Input Toggles – When the checkbox above the respective column is active, all the key bindings in that column will be received even if VRMT is in the background or minimized.
- Global Toggles – These shortcut keys will activate or deactivate their respective Global Input Toggle boxes for their column, and are always subject to global input themselves.
- Alt Camera – When this key (Alt by default) is held, it activates traditional VTuber program camera controls, where the left mouse button rotates the camera around the avatar, the right mouse button or mouse wheel moves the camera back and forth, and the middle mouse moves the camera up/down and left/right.

Gamepad Controls
Here’s where you can configure controller input settings and shortcut bindings. All types of controllers are fully supported, including for global (background) input if enabled.
Gamepad Input Settings
- Left/Right Stick Deadzone – If your controller analog sticks have a drift problem where they are always inputting a certain direction even if you’re not moving them yourself, you can increase this value to fix it.
- Left/Right Stick Max Input – Opposite of the analog stick deadzone, determines how far you have the move the stick before it reaches the maximum input value for any given direction.

Virtual Controllers
One of the main features of the program, which equips your avatar with a 3D gamepad and lets them push all the same buttons buttons you are pushing on your own controller. You can also display the same controller directly on the camera/scren, and change the position, colors, and particle effects of both.
Show Avatar Controller
- Arm Angle – Raises your avatars arms up and down while they’re holding the controller.
- Hand Angle – Spreads your avatars hands apart, but you have have to adjust the Size after.
- Size – Changes the size of the avatar controller, if it’s too big or small, you may need to adjust the hand angle.
- Particle Intensity – Change the size and lifetime of the particles that shoot out when your avatar pushes a controller button.
Show Camera Controller
- Position – Moves the camera virtual controller around the screen.
- Size – Makes the camera VC bigger or smaller.
- Transparency – Makes the camera VC more or less able to be seen through.
- Particle Intensity – Adjust the size and lifetime of particles that shoot out of the camera controller when a button is pressed.
- Controller Colors – Adjust the colors of all the different parts of the VC (buttons, d-pad, etc.)
- Mouse movement Controls – Choose if you want mouse movements to affect the movement of the virtual controller analog sticks.
- While Window Focused – Choose how you want the VCs to respond when VRMoveTime is the active window:
- Gamepad Controls VC – Your gamepad will continue to push the VC buttons instead of controlling the avatar while the avatar or camera VC is active.
- Gamepad Controls Avatar – Move the avatar rather than pushing the VC buttons.
- Gamepad Controls Both – Your gamepad will both move the avatar and push VC buttons.

Interface Options
- Menu Language – Choose between English, Spanish, or Japanese for all menus.
- Menu Scale – Change the size of all of the menus, or change them individually.
- Show Advanced Options* – Reveals options that have an asterisk* in their name, such as Process Priority* in the Display [9th] tab.
- Pixel Perfect Menus* – Changes the composition of the menu graphics, which can look better at some resolutions.
- Drag Distance* – Changes how far you have the drag items like stickers to pick them up with the mouse.
- Tool, Image, and Button Tips – Affects whether each kind of tip will be displayed when hovering the mouse over options.
- Tool Tip Delay – Changes how long you have to hover the mouse over and option before in-app information about that option is shown.

Sound
Here you can adjust the volume of in-app sounds, and the volume of any sound effects imported along with VSFAvatars.

Video & Post Processing
These are options that can enhance or modify the appearance of the avatar and scene:
Video Options
- Resolution – Changes the size of the app window.
- Lock Aspect Ratio – Keeps the window proportions the same even if it is resized, this should usually be left at the standard 16:9 ratio for streaming, as VRMoveTime is meant to use the full stream area so your avatar can move around in the stream freely.
- Resolution Scaling – Allows the resolution of the avatar to be higher than the size of the app window by multiplying it by the specified amount. This effectively increases the rendering quality of your avatar in the OBS/Spout2 source (or other streaming software) source. You should set this multiplier to the lowest possible value where your avatar looks the best on stream, as increasing it too high may cause slowdown.
- Max Resolution – Prevents resolution scaling from increasing the OBS/Spout2 source from being increased too high.
- Window Mode – Switches between Window, Fullscreen, and Borderless Window display modes.
- Frame Rate Cap/Max Frame Rate – Prevents VRMoveTime from running at a framerate faster than necessary. This setting should match the frame rate of your stream for best performance. Forced On mode guarantees VRMoveTime will be synced to a specific framerate but should not be necessary (and may decrease performance).
- Process Priority* – An advanced option that tunes the CPU priority of VRMoveTime to be greater or less than other applications, and should be left at Normal in most circumstances.
- Vertical Sync – Prevents screen tearing which can be caused monitor frame rate differences.
- Window Resizing – Prevents or allows the window size to be altered by dragging the edges.
- Take Screenshot / Screenshot Size – Takes a screenshot with background transparency, temporarily changing Resolution Scaling to take a larger or smaller screenshot if needed.
Display
- Brightness – Brightens or darkens the scene.
- Contrast – Enhances or dilutes the differences between bright and dark colors in the scene.
- Saturation – Either mutes or enhances all colors in the scene.
- Sharpening – Uses luminescence to sharpen colors and the appearance of textures and surfaces.
Graphics Quality
- Anisotropic Filtering – Improves the appearance of textures when viewed at sharp angles.
- Anti-Aliasing (MSAA) – Smooths out jagged edges on surfaces, usually most apparent on outlines.
- Advanced AA/Upscaling – Use post processing to apply additional Anti-Aliasing or Resolution Scaling to enhance the appearance of your avatar through several different methods, ranging from basic to more advanced. Choose the one that makes your avatar look the best as the difference in performance is usually negligible:
- FXAA (Fast Approximate Anti-Aliasing) – Applies additional smoothing, lowest performance cost
- SMAA (Subpixel Morphological Anti-Aliasing) – Similar to FXAA, usually slightly higher quality
- TAA (Temporal Anti-Aliasing) – Applies smoothing using data over multiple frames
- FSR 3.1 (Fidelity Super-Resolution) – Applies smoothing similar to TAA and using upscaling produces a higher quality image. This option can potentially improve performance by allowing the Resolution Scaling slider to be lowered while maintaining the same quality image.
- DLSS (Deep Learning Super Sampling) – Similar to FSR, but requires an RTX/NVidia graphics card, and potentially produces a higher quality image than FSR with better performance and has effect of emphasizing avatar outlines.
- Shadows – Changes the style and quality of character shadows, options higher than Basic Projection are real time shadows and require Sun Intensity to be higher than 0 in the Scene (3rd) tab.
Post Processing
- Ambient Occlusion – Enhances shadows on surfaces.
- Bloom / Bloom Color – Adds a light halo to objects, with a customizable color.
- Chromatic Abberration – Causes colors to diffuse off of the avatar and other objects.
- Color Split – Splits the red, green, and blue color channels of the avatar and other objects from each other.
- Depth of Field – Simulates a blurring effect for distant objects out of focus from the camera.
- Film Grain – Adds a retro film filter to the avatar and other objects.
- Kuwahara Filter – Adds a filter to the avatar and other objects that can make them look like a watercolor or oil painting.
- Motion Blur – Adds a slight blur effect when the avatar/camera moves.
- Outline Enhancement / Outline Color – Extends the edges of objects with a customizable color, which can be used to hide any jagged edges not taken care of by Anti-Aliasing.
- Pixelate – Adds a mosaic filter to the avatar and other objects.
- Scan Lines – Adds a retro filter to make it look like the avatar is on an old monitor screen.

Accessibility
Contains filters for three major types of colorblindness: Protanopia (Red), Deuteranopia (Green), and Tritanopia (Blue), with a setting for filter strength when enabled.
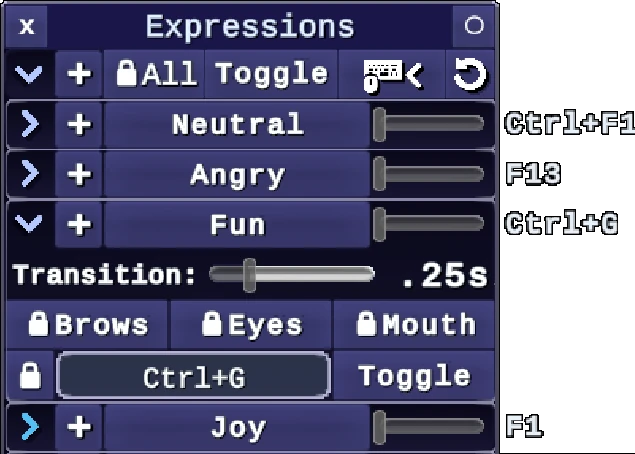
Expressions Menu
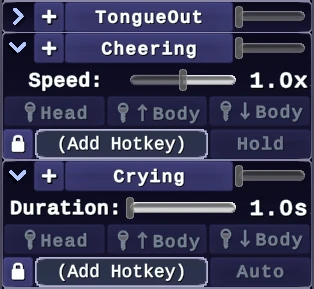
Accessed with Tab (default) or by enabling the checkbox in the upper right of the first tab. This menu automatically creates buttons for each expression, animation, or custom VSFAvatar feature you have added to your model. The +Button changes the expression to be additive, so it can be activated at the same time as other expressions, and the sliders to the right can set the degree of the expression.
Expression Options
For all expressions:
- 🔒Button – Prevents the expression from being activated (or deactivated). Useful if you have NSFW expressions or outfits that you don’t want to use accidentally
- Toggle Button – Can be clicked 3 times to change between Toggle, Hold, and Auto mode. Hold mode requires the expression’s hotkey to be held down to keep it active, while Auto mode will automatically deactivate the expression after the specified duration.
- Duration Slider – Only active while Auto mode is selected from on the Toggle button. Controls how long the expression will stay active until automatically turning itself off. If the expression is non-looping animation from a VSFAvatar file and the duration is set to 1 second or less, it will smoothly deactivate the expression right when the animation is done playing, which can be useful for animations like hand gestures or backflips.
For facial expressions:
- Transition Slider – Controls how long it takes for the expression to fully activate.
- 🔒Brows, 🔒Eyes, and 🔒Mouth – Prevents these parts from being affected by face tracking while the expression is active
For animations (imported with VSFAvatars):
- Speed Slider – Controls how fast the animation plays.
- 🔒Head, 🔒↑Body, and 🔒↓Body – Active by default for each animation, and prevents the head, upper body, and/or lower body from being affected by head/body tracking while the animation is active.